

Author: Alex Xia, Student Technology Consultant
Introduction
Hi there, I am Alex, a technology consultant. This week I am going to share a bit about One Button Studio and some of the tips. One Button Studio (OBS) is a professional recording studio that gives Wake Forest members the opportunity and resource to digital storytelling. It is located at the Bridge in ZSR library.
Reservation
Although sometimes you can do a walk-in session in the OBS, I would always recommend making a reservation beforehand. You can contact Brianna Derr, the manager of Advanced Learning Projects, or the front desk of Bridge, to reserve a time for your recording session. In this way, you will not find someone is using the OBS and you have to wait for an hour or so.
Another reason that I recommend making a reservation is that one of our technology consultants can be there to assist you or answer any questions you might have regarding the use of OBS. Each of us have office hours at the Mac lab besides Bridge from 6 to 10, Mondays through Thursdays. If you would like to use the OBS other times during the day, please contact Brianna; maybe we can still set up a time to meet at OBS. With one of the technology consultants there to help you, we would walk you through each step of using the OBS, explain how to use each equipment, and then you can start your recording smoothly!
Tips & Tricks
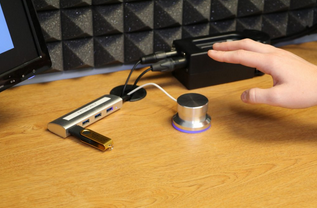
OBS is designed to be easy to use. Simply plug in your flash drive to the USB hub on the desk and the recording session will be ready in seconds, but before you push the silver button to start recording, here’s a few things that I would like to talk about.
You can either bring your own flash drive or borrow a flash drive from the front desk of Bridge, but remember to return the flash drive! Inside the OBS, the microphone is located on the room ceiling, approximately in the middle of the room. For the best audio quality possible, you may want to stand or sit under the microphone.
Your video will be recorded through the camcorder on the tripod. You can check the composition of the shot on the computer screen. If you feel like the shot is too wide or too close, you can adjust the framing with the zoom control button on the camcorder (it looks like a switch). Feel free to adjust the tripod to reframe if you are sitting on the chair and find the camcorder is pointing too high, or the other way around. Again, if you don’t feel confident about doing all these, the technology consultants are always there to help!
Last tips when using the OBS is the green screen system. If you wish to replace the background of your video after recording, you will need to turn on the green screen system, and swap out the green background during post production (we can do a tutorial on that if a lot of you are interested). To turn the green screen on, you need to find the black control box on the desk. On the control box, you will see the instructions: up for green screen, and down for blue screen. Depending on what colors of clothes you are wearing, we can choose the color of the screen. If you see the LED lights on the camcorder is on, your green screen/blue screen is successfully turned on.
After Recording
After you finish recording, you can check your footage on your laptop or go to the Mac lab to check your footage. Some of the students prefer to edit their footage in the Mac lab right away. If you prefer to do that, the technology consultants in the Mac lab may help you through questions or problems regarding post production. Please feel free to reach out!